I teach a digital media marketing class that’s about a hundred miles away from my office, so this semester I tried an alternative to traditional “distance learning.” Rather than driving on campus every week or prepare stale lectures, I utilized the power of Google+ Hangouts to facilitate half of my classes this semester.
- Class participation increased dramatically because students were free to chat, tweet or share their feedback without fear of being put on the spot.
- Every class lecture or discussion is archived and available on the YouTube Channel.
- More than two-thirds of my students reported improved class engagement and satisfaction from using the Google Hangout classroom.
Specifically in this post, I am going to walk through the steps that will help you utilize Google Hangouts in your classroom, but the steps outlined here can also be used for any business, academic or extracurricular purpose. In case you don’t make it all the way to the end of this post, I will host a Google Hangout about Google Hangouts on May 21 at 4:00 PM EDT. All are welcome, RSVP here.
Overall there are a few lessons I learned to make the virtual classroom even better, which I will share at the end of this post, but I really wanted to share the basic approach that I used with Google Hangouts in the classroom. Despite some of the complexity and length of this post, using Hangouts is easy. You have to establish your objectives and constraints to determine what elements discussed are important to your specific use.
1. Constraints
- Class size -Â Google Hangouts limits the number of free, simultaneous connections to 10. With a class size of 20-30 students, I needed a way to allow some students to join in the class conversation through Google Hangout but still allow everyone to participate with the conversation.
- Chatting – Also, I wanted to allow the class to have a free-flow of conversation during the class.
- Simplicity – While everyone’s definition of simplicity varies, I wanted to have a single location where students could watch the broadcast and interact with classmates.
As a result, here is the final “virtual classroom” layout that I created.
2. Getting Started with Google Hangouts
1. Of course, you must have a Google+ account. If you don’t already have one, get it here.
2. First timer? If you have never used Google Hangout before, here is a quick tutorial that I prepared for my students.
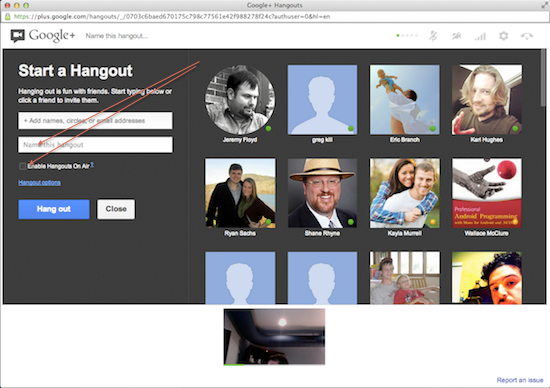
3. Start the Hangout by entering a name of the hangout AND checking “Enable Hangouts On Air.” If you have never done this before, you will be prompted to validate your YouTube account. This will allow you to broadcast and store hangouts that are longer than 15 minutes. As a side benefit, it also lifts the 15 minute restriction from your YouTube account.
While you may want to find a friend to practice your Google Hangout skills, you can do many of the things discussed in this post by starting your Hangout without inviting anyone. In fact, you can even “broadcast” to your YouTube channel without anyone else joining you.
4. Broadcast! When the Hangout first launches, your Hangout is not broadcasting. Â To start it, click the Start Broadcast button.
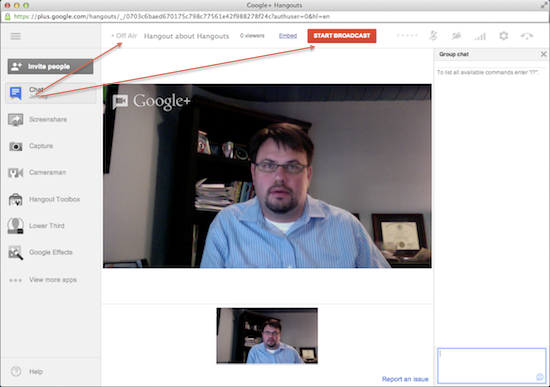
You can always tell whether you are broadcasting by the “On Air” or “Off Air” text at the top of the screen.
Once the connection is established with YouTube, you will receive a 10 second countdown and then voila you’re broadcasting On Air!
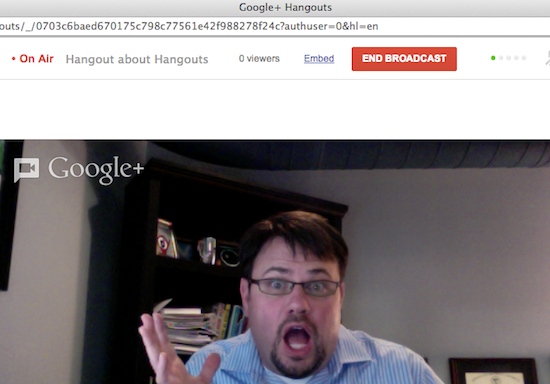
Great, now you’ve made your first broadcast and are ready to have an On Air Hangout! If you record more than 2 minutes, the video will be available on your YouTube channel/page.
Note: only the host of the hangout has the ability to Broadcast it. If you don’t see the Start Broadcast button, check to make sure that you have checked the “Enable Hangouts On Air” and that you are hosting the Hangout.
Also note that once you End Broadcast, you cannot restart the broadcast during that Hangout. In order to Broadcast again, you must reinitiate the Hangout.
3. Planning Your Google Hangout Classroom
Where is everyone going to meet virtually? If the 10 connection limitation does not pose a problem for you, then you may not need to use On Air broadcasts at all. You may use Google+ and the Events to schedule and hold your Hangout.
I divide my classes into 5-6 groups with approximately 5 students in each group. For each week’s assignment, alternating groups are invited to the Hangout and responsible for moderating that week’s content.
Let me save you the pain and frustration of one of the weirdest Google+ conundrums that you will experience: on air Events and On Air Broadcasts are NOT the same thing. Always the clever one, I thought that I could schedule a Google+ On Air Hangout by selecting the “Make this an event on air” option. Nope. Notta chance. Never will this option broadcast your Hangout as outlined. On air events simply mean public events.
If you are not broadcasting the Hangout, however, you may select the Google+ Hangout option, which will invite all participants at the scheduled time. This is VERY convenient for Hangouts that are NOT going to be broadcast.
If you plan to broadcast the Hangout AND you use events to organize your hangout, then tell your students to await your invitation. They cannot initiate the Hangout or you will lose the ability to Broadcast it.

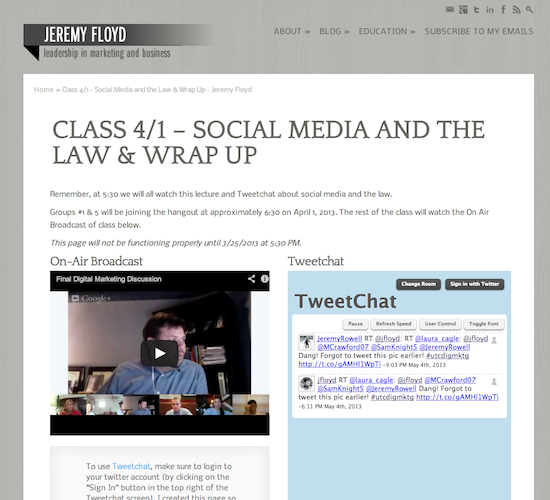
For my class, I wanted to host the Hangout on my website. While I could have elected to share the YouTube link with my students and have them use Tweetchat or their favorite Twitter client, I thought that might be cumbersome, so I created a simple two-column page template on my website.
A week before the virtual class, I published the class page for that week on my weekly plan. For each class, I created a different page, which is visible above in the menu Education > Virtual Classes. It is probably, simpler, however, for the students to visit the same page each week.
Regardless of your approach, do as I say and not as I do: be prepared to start your Hangout 20 minutes before you are scheduled to start. You will never believe the odd issues that happen minutes before class starts. (see these tips)
4. Publishing Google Hangout Broadcast and Tweetchat on Your Website
This section gets the NC-17 rating. If the sight of HTML sends you into convulsions then you may want to skip this section or risk dropping more F-bombs than a New York taxi driver.Â
First of all, I chose Tweetchat as the class chat medium. There are a variety of alternatives to this approach, this just happens to be the route that I chose.
In my WordPress template page, I have two columns: one for the YouTube stream and the other for the Tweetchat. Despite this icky code below, I promise this is super simple as long as you know where to post the code.
In my page template, I have the following code in the left column for the YouTube stream:
<!--PUT GOOGLE HANGOUT CODE HERE-->
<iframe src="http://www.youtube.com/embed/" height="315" width="420"></iframe>
<!--STOP PUTTING GOOGLE HANGOUT CODE HERE-->
This is simply placeholder code. It will appear as a black box on the page since the YouTube link is essentially blank.
Further down the page, I have the following Tweetchat code, which displays in the right column:
<!--PUT TWEETCHAT CODE HERE-->
<iframe src="http://www.tweetchat.com/room/utcdigmktg" height="640" width="420" frameborder="0"></iframe>
<!--STOP PUTTING TWEETCHAT CODE HERE-->
In this case, #utcdigmktg is the hashtag of the Tweetchat. If the size dimensions are acceptable (640 x 420), then change only the hashtag to match yours, and paste this code into your template.
If you have these two elements on your page and are satisfied with the way everything looks, then you’re template is ready for class. You only have to make one adjustment when class is ready to start.
1. Open your WordPress Page to Edit.
2. In a separate browser window, start your Google Hangout and invite your students.
3. Once everyone is ready, click the Broadcast button.
4. Click the “Embed” link, and the YouTube link and embed code will be exposed.
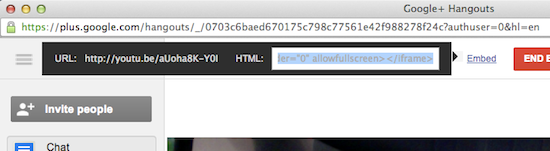
5. Copy the HTML and paste the code between the comments on your WordPress page:
<!--PUT TWEETCHAT CODE HERE-->

BOOM! Paste it right here!
<!--STOP PUTTING TWEETCHAT CODE HERE-->
6. Publish or Update the page and you’re in business.
5. Tips that will make you say “Thank You”
After a few embarrassing class starts this semester, let me offer a few pointers that will make your education Google Hangouts a success.Spend some time explaining the ground rules with your students. Tell them how you are going to invite them to the hangout, and consider a few of the best practices below.
1. Reverb, Eliminate it. It will make you feel like you have been on acid for 4 days straight. Before you broadcast, have a short conversation and make sure that no one is causing reverb. If they are, you can mute any user during the Hangout. If you are troubleshooting reverb, make sure to mute everyone and then add each person back one by one. Usually, the person that says, “it’s not me” is the culprit.
2. Headsets – iPhone headsets with the built-in microphone are one of the best options. The built-in iPhone/tablet/computer mics pick up background noise and sometimes contribute to reverb. If possible use a headset of some sort.
3. Safari – Safari has posed problems in some Hangouts (specifically with muting). If possible use the Google Chrome browser.
4. Failsafe –  It is a good idea to have a backup plan. In the event that you have total failure, have the class jump on a speek call or tweet using the designated hashtag. Establish it clearly and communicate with everyone before the Hangout.
5. To repeat from above, on air Events and On Air Broadcasts are NOT created equal. On air events simply mean public events.
6. Assign someone to monitor the Twitters. It is sometimes challenging to keep tabs on your presentation, the conversation and the twitter feed. I usually assign one of the students on the Hangout to monitor the Twitter stream and interrupt if an interesting question arises.
7. Install Hangout Toolbox – While it’s not necessary, the toolbox offers some helpful features like lower third titles. Here is an example of a Hangout where we used lower thirds:
8. Hide your camera until you’re ready. If you are posting the embed code to a page while the Hangout is starting, the first 30 seconds of your hangout look like those awkward videos of the FBI monitoring your webcam when you accidentally stumble upon one of “those” sites. Either mute your camera or Screenshare something on your computer when you begin.
9. Screenshare is your friend. Seriously, it is awesome. You can share anything from presentations to your browser. It is a great teaching aid to “drive” while your students watch.
10. Be early & Be Prepared. Cutting it close won’t cut it. You need the extra time to insure that your Hangout is a success. Also, avoid switching plans at the last minute. Once I changed plans to have a virtual class on-site. The unknown conditions of the connection speed and audio system created a disastrous result.
Conclusion and Invitation
You’re cheating, you didn’t read all 1800 words. I know this is a ton of information, but I hope that you find it helpful in your classroom, board room or play room. I would love to hear about your experiences with Google+ Hangouts in the classroom.
For anyone interested, I will have a Google Hangout about Google Hangouts on May 21 at 4:00 PM EDT. All are welcome, RSVP here.